- Published on
Godzilla Vol 1 #14
Publisher: Marvel Comics
September, 1978
Editor-in-Chief: Jim Shooter
Cover Artists: Herb Trimpe, Bob Layton
"Mega-Monsters Part III: The Super-Beasts"
Writers: Doug Moench
Pencilers: Herb Trimpe
Inkers: Dan Green
Colourists: Don Warfield
Letterers: Shelly Leferman
Editors: Bob Hall
Appearing in "Mega-Monsters Part III: The Super-Beasts"
Featured Characters:
Godzilla
Supporting Characters:
S.H.I.E.L.D.
Godzilla Squad
Gabriel Jones
Jimmy Woo
Timothy "Dum Dum" Dugan
Antagonists:
Megans' Monsters (Last appearance)
Triax (Death)
Rhiahn (Death)
Krollar (Death)
Other Characters:
Betans
Megans
Hugh Howards
Robert Takiguchi
Tamara Hashioka
Yuriko Takiguchi
Locations:
Earth
United States of America
Utah
Salt Lake City
Items:
Red Ronin


Synopsis for "Mega-Monsters Part III: The Super-Beasts"
With the Red Ronin robot destroyed, Godzilla is the only force capable of stopping the now super-powered Mega-Monsters. The SHIELD Godzilla Squad provides Godzilla with support while Jimmy Woo recovers the unconscious Rob from the head of the Red Ronin robot. While aboard their base on the moon, the dying Betans watch the battle rage on. In order to maintain their life support as long as possible, they lower their base into the moon's surface, however all the Betans die except one.
As the battle rages on, Godzilla is able to destroy Rhiahn with his flame blast, save Dum Dum from Krollar, burn Triax from the inside out with his flame breath, and then use Krollar's own bio-blade to behead the creature. With the Mega-Monsters destroyed, the lone Betan rejoices over Godzilla's victory while the Megans decide to cease their war against the Betans. On Earth, the Godzilla Squad decides to let Godzilla go, vowing to capture him at a later date.
Notes
Leferman is credited as S. Lefferman.
This issue is reprinted in Essential Godzilla, Volume 1.
- Published on
Godzilla Vol 1 #13
Publisher: Marvel Comics
August, 1978
Editor-in-Chief: Jim Shooter
Cover Artists: Herb Trimpe
"The Mega-Monsters from Beyond! Part II: Triax"
Writers: Doug Moench
Pencilers: Herb Trimpe
Inkers: Fred Kida
Colourists: Don Warfield
Letterers: John Costanza
Editors: Jim Shooter
Appearing in "The Mega-Monsters from Beyond! Part II: Triax"
Featured Characters:
Godzilla
Supporting Characters:
S.H.I.E.L.D.
Godzilla Squad
Gabriel Jones
Jimmy Woo
Timothy "Dum Dum" Dugan
Antagonists:
Megans' Monsters
Triax
Rhiahn
Krollar
Other Characters:
Betans
Megans
Hugh Howards
Robert Takiguchi
Tamara Hashioka
Yuriko Takiguchi
Locations:
Earth
United States of America
Utah
Salt Lake City
Earth Orbit
Moon
Items:
Red Ronin

Synopsis for "The Mega-Monsters from Beyond! Part II: Triax"
With the arrival of Triax on Earth, Robert in the Red Ronin and Godzilla team up to battle the monster; however, when Triax is overpowered, the Megans send down their other two monsters, Rhiahn and Krollar, to aid their fellow Mega-Monster.
As the battle rages on, the Megans attack the Betan's base on the moon while, and the SHIELD Godzilla squad tries to coordinate the military counter attack against the monsters. During the course of the battle, the Betan's dome is breached, exposing them to the vacuum of space, and the Megans charge their monsters with an energy beam that makes them stronger than ever.
To make matters worse, Rhiahn is able to chop off the head of the Red Ronin robot, deactivating it and knocking Robert unconscious, leaving Godzilla to battle the super-powered monsters alone.
- Published on
Godzilla Vol 1 #12
Publisher: Marvel Comics
July, 1978
Editor-in-Chief: Jim Shooter
Cover Artists: Herb Trimpe, Joe Rubinstein
"The Mega-Monsters from Beyond! Part One: The Beta-Beast!"
Writers: Doug Moench
Pencilers: Herb Trimpe
Inkers: Fred Kida
Colourists: Mary Titus
Letterers: Bruce Patterson
Editors: Jim Shooter
Appearing in "The Mega-Monsters from Beyond! Part One: The Beta-Beast!"
Featured Characters:
Godzilla (Main story and flashback)
Supporting Characters:
S.H.I.E.L.D.
Godzilla Squad
Gabriel Jones
Jimmy Woo
Timothy "Dum Dum" Dugan
Antagonists:
Yetrigar (Only in flashback)
Beta-Beast (Only appearance; dies)
Megans' Monsters (First appearance)
Triax (First appearance)
Rhiahn (First appearance)
Krollar (First appearance)
Other Characters:
Betans (First appearance)
Megans (First appearance)
Hugh Howards
Robert Takiguchi
Tamara Hashioka
Yuriko Takiguchi
Locations:
Earth (Main story and flashback)
United States of America (Main story and flashback)
Arizona (Main story and flashback)
Grand Canyon (Main story and flashback)
Earth Orbit
Moon
Items:
Red Ronin

Synopsis for "The Mega-Monsters from Beyond! Part One: The Beta-Beast!"
As both the Godzilla Squard, and Robert in the Red Ronin speed after Godzilla, the King of Monsters is suddenly transported to the moon. There it fights a creature known as the Beta-Beast, which Godzilla eventually destroys with its powerful fire breath.
Following the creatures defeat, Godzilla is confronted by the beings who transported him to the moon: aliens of the Betan race. These aliens appeal to Godzilla, telling the monster that their world has been at war against the Megans for centuries using giant monsters as weapons against each other. With the war effort depleting the Megan supplies, they have sent three of their monsters: Triax, Rhiahn and Krollar to Earth in order to plunder it.
With Godzilla accepting the mission, he is transported back to Earth just as the Red Ronin is confronted by the first of the invaders: Triax.

- Published on
"Y'know, Dum-Dum, you take the cake. Here we are chasing Godzilla and a zillion-foot tall man-ape and you scoff at something only a few feet bigger than a gorilla." - Gabriel Jones
Godzilla Vol 1 #11
Publisher: Marvel Comics
June, 1978
Editor-in-Chief: Archie Goodwin
Cover Artists: Herb Trimpe
"Arena for Three!"
Writers: Doug Moench
Pencilers: Herb Trimpe
Inkers: Fred Kida
Colourists: Mary Titus
Letterers: Irv Watanabe
Editors: Archie Goodwin
Appearing in "Arena for Three!"
Featured Characters:
Godzilla
Supporting Characters:
S.H.I.E.L.D.
Godzilla Squad
Gabriel Jones
Hugh Howards
Jimmy Woo
Robert Takiguchi
Timothy "Dum Dum" Dugan
Antagonists:
Yetrigar
Other Characters:
Jeff
Jillian
Mary
Ron
Locations:
Arizona
Grand Canyon
Items:
Red Ronin
Vehicles:
S.H.I.E.L.D. Flying Car
S.H.I.E.L.D. Helicarrier


Synopsis for "Arena for Three!"
As Godzilla and Yetrigar's battle rages on in the Grand Canyon, Robert arrives in the Red Ronin robot to try and stop the two beasts from fighting each other. While Robert has the Ronin protect some rafters from falling rocks, the two monsters battle on. While elsewhere, the SHIELD Godzilla squad continues to make repairs to their damaged helicarrier and Dum Dum and Gabriel travel in a ship to try and keep track of Godzilla.
While back at the Grand Canyon, Robert is unable to make the two monsters stop fighting, and in order to prevent Yetrigar's rampage from escalating, he is forced to use the Red Ronin robot to kill Yetrigar by burying the beast in an avalanche. During the confusion, Robert allows Godzilla to slip away, however the fact that he had to kill in order to protect Godzilla weighs heavily on the boy.
Notes
This issue is reprinted in Essential Godzilla, Volume 1.
Yetrigar appears next in West Coast Avengers v.2 #32.
- Published on
"Don't just stand there helpless, ya lamebrained yahoos! Least ya can do is start cussin', like me!" - "Dum Dum" Dugan
Godzilla Vol 1 #10
May, 1978
Editor-in-Chief: Archie Goodwin
Cover Artists: Herb Trimpe
"Godzilla Vs Yetrigar"
Writers: Doug Moench
Pencilers: Herb Trimpe
Inkers: Fred Kida
Colourists: Mary Titus
Letterers: John Costanza
Editors: Archie Goodwin
Appearing in "Godzilla Vs Yetrigar"
Featured Characters:
Godzilla
Supporting Characters:
S.H.I.E.L.D.
Godzilla Squad
Gabriel Jones
Jimmy Woo
Timothy "Dum Dum" Dugan
Antagonists:
Yetrigar (First appearance)
Other Characters:
Robert Takiguchi
Tamara Hashioka
Jeff
Jillian
Johnny
Mary
Ron
Locations:
Arizona
Grand Canyon
Canada
Alberta
Items:
Red Ronin
Vehicles:
S.H.I.E.L.D. Helicarrier

Synopsis for "Godzilla Vs Yetrigar"
Three months ago
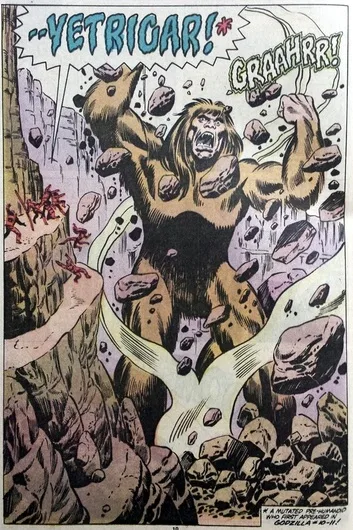
An underground nuclear test is conducted by the US Department of Defense in Arizona, but yields some unforeseen side-effects. The radiation from the test is channeled into an underground rift, a subterranean passage stretching from Arizona to Alberta, Canada. In Alberta, the radiation comes to fill an ice cave, within which a hairy, near-human creature is encased in a glacial tomb, one of the legendary Sasquatch. The Sasquatch is freed from the ice by the radioactivity and revived. The newly revived monster is pained by the continuing effects of the radiation on his body. His mind filled with rage, the bigfoot turns south, towards where he instinctively senses the source of his affliction originates. As he strides southward, however, the radiation begins to make the man-monster start to grow.
The present
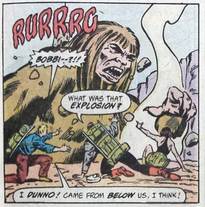
The S.H.I.E.L.D. Helicarrier follows the trail of Godzilla from Las Vegas, Nevada to the Grand Canyon in Arizona. Gabe Jones has reservations about using S.H.I.E.L.D. ordnance in the canyon, but Dugan scoffs, calling him a monster-lover. They finally locate Godzilla, but when they do, they also witness the gigantic Big Foot known as a Yetrigar.
Three months ago
An underground nuclear test is conducted by the US Department of Defense in Arizona, but yields some unforeseen side-effects. The radiation from the test is channeled into an underground rift, a subterranean passage stretching from Arizona to Alberta, Canada. In Alberta, the radiation comes to fill an ice cave, within which a hairy, near-human creature is encased in a glacial tomb, one of the legendary Sasquatch. The Sasquatch is freed from the ice by the radioactivity and revived. The newly revived monster is pained by the continuing effects of the radiation on his body. His mind filled with rage, the bigfoot turns south, towards where he instinctively senses the source of his affliction originates. As he strides southward, however, the radiation begins to make the man-monster start to grow.
The present
The S.H.I.E.L.D. Helicarrier follows the trail of Godzilla from Las Vegas, Nevada to the Grand Canyon in Arizona. Gabe Jones has reservations about using S.H.I.E.L.D. ordnance in the canyon, but Dugan scoffs, calling him a monster-lover. They finally locate Godzilla, but when they do, they also witness the gigantic Big Foot known as a Yetrigar.

Hurling a huge boulder at the S.H.I.E.L.D. Helicarrier, Behemoth, Yetrigar takes S.H.I.E.L.D. out of the action. On the bridge of the Helicarrier, Robbie Takiguchi sneaks past the scrambling S.H.I.E.L.D. agents and gains access to the Red Ronin battlesuit. He hopes to intervene on Godzilla's behalf in his battle against Yetrigar.
Yetrigar ambushes Godzilla at the rim of the Grand Canyon, causing both monsters to topple into the natural wonder. The fall doesn't give them pause however, and they continue clawing and biting at one another. Godzilla blasts Yetrigar with his flame breath, but Yetrigar deflects it with a giant boulder. Godzilla maintains the upper hand though as he batters Yetrigar with his tail, then chomps down on his arm. Yetrigar frees his arm then punches Godzilla across the snout. The battle soon escalates when Red Ronin arrives to prevent the monsters from killing each other.
Yetrigar ambushes Godzilla at the rim of the Grand Canyon, causing both monsters to topple into the natural wonder. The fall doesn't give them pause however, and they continue clawing and biting at one another. Godzilla blasts Yetrigar with his flame breath, but Yetrigar deflects it with a giant boulder. Godzilla maintains the upper hand though as he batters Yetrigar with his tail, then chomps down on his arm. Yetrigar frees his arm then punches Godzilla across the snout. The battle soon escalates when Red Ronin arrives to prevent the monsters from killing each other.
Notes
This issue is reprinted in Essential Godzilla, Volume 1.
First appearance of Yetrigar. Yetrigar appears next in Godzilla #11.
Trivia
The tagline for this issue is "Here Comes Yetrigar! The Biggest Big Foot of them All!"
The name "Yetrigar" is taken from Japanese folklore and refers to a mythological race of Yeti.

- Published on
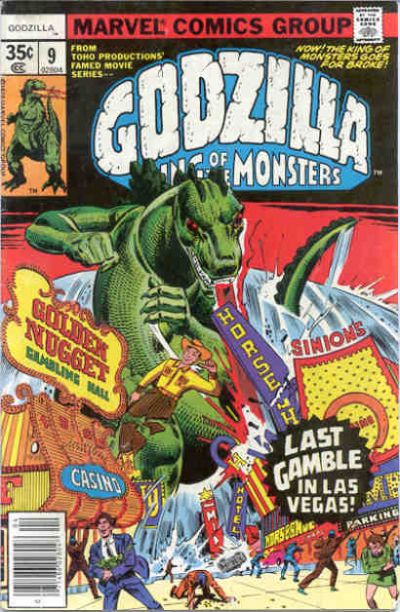
Godzilla Vol 1 #9
Publisher: Marvel Comics
April, 1978
Editor-in-Chief: Jim Shooter
Cover Artists: Herb Trimpe
"The Fate of Las Vegas"
Writers: Doug Moench
Pencilers: Herb Trimpe
Inkers: Fred Kida
Colourists: Mary Titus
Letterers: Rick Parker
Editors: Archie Goodwin
Appearing in "The Fate of Las Vegas"
Featured Characters:
Godzilla
Supporting Characters:
S.H.I.E.L.D.
Godzilla Squad
Gabriel Jones
Jimmy Woo
Timothy "Dum Dum" Dugan
Other Characters:
Hugh Howards
Robert Takiguchi
Tamara Hashioka
Yuriko Takiguchi
Winslow Beddit
Locations:
Boulder Dam
Items:
Red Ronin

Synopsis for "The Fate of Las Vegas"
Godzilla has just arrived outside of Las Vegas and has attacked Boulder Dam, the torrent washing Godzilla towards the city of sin, which entices the creature with its shiney lights. While in the city, Winslow Beddit, has only one dime left and a choice: use it to call his wife or put it in the slots in hopes of winning riches which may pay for medical treatment for his mother.
As Winslow's luck begins to change and he actually starts winning Godzilla strikes the city, and the Godzilla Squad prepares to mobilize out to the area. Soon the rest of Boulder Dam cracks open, causing a torrential flood that decimates the city, causing Winslow to lose his riches. While Godzilla leaves the city for a more peaceful local, Winslow's riches have been washed away except for one last dime. This time he chooses to call his wife, who as we find out had left him three years prior AFTER his mother had died.
- Published on
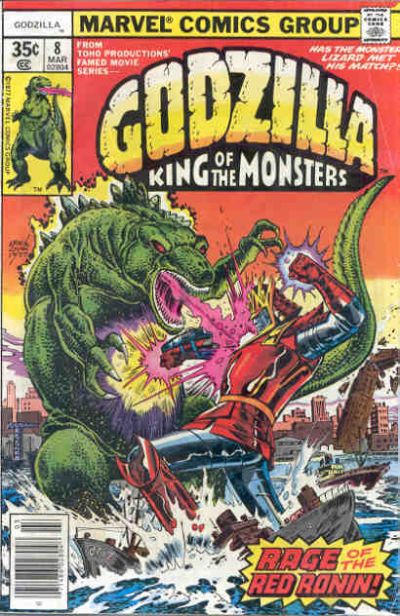
Godzilla Vol 1 #8
Publisher: Marvel Comics
March, 1978
Editor-in-Chief: Jim Shooter
Cover Artists: Ernie Chan
"Titan Times Two!"
Writers: Doug Moench
Pencilers: Herb Trimpe
Inkers: Herb Trimpe
Colourists: Phil Rache
Letterers: Denise Wohl
Editors: Archie Goodwin
Appearing in "Titan Times Two!"
Featured Characters:
Godzilla
Supporting Characters:
S.H.I.E.L.D.
Godzilla Squad
Gabriel Jones
Jimmy Woo
Timothy "Dum Dum" Dugan
Other Characters:
Hugh Howards
Robert Takiguchi
Tamara Hashioka
Yuriko Takiguchi
Items:
Red Ronin

Synopsis for "Titan Times Two!"
With only the Red Ronin, piloted by Robert Takiguchi standing between Godzilla and the San Diego militaries nuclear stock pile, the SHIELD Godzilla Squad wonders what to do next.
Robert attacks Godzilla to try to keep him away, and tries to come to grips with the notion that to save everyone he must kill his beloved Godzilla. However, when the SHIELD helicarrier is about to attack Godzilla, Robert comes up with another idea and using cables droped from the Red Ronin's feet, Robert harnesses Godzilla and flies him away from the missiles.
Godzilla however, breaks free and begins to rampage along the San Diego shore line, forcing SHIELD to take action, however, Robert keeps them at bay with the Red Ronins weapons, and points out to sea, Godzilla taking the boys meaning leaves the scene. Afterwards, Robert believes that Godzilla is now his friend.
- Published on
Godzilla Vol 1 #7
Publisher: Marvel Comics
February, 1978
Editor-in-Chief: Archie Goodwin
Cover Artists: Herb Trimpe, Ernie Chan
"Birth of a Warrior!"
Writers: Doug Moench
Pencilers: Herb Trimpe
Inkers: Fred Kida
Colourists: Janice Cohen
Letterers: Glenn Simek
Editors: Archie Goodwin
Appearing in "Birth of a Warrior!"
Featured Characters:
Godzilla
Supporting Characters:
S.H.I.E.L.D.
Godzilla Squad
Gabriel Jones
Jimmy Woo
Timothy "Dum Dum" Dugan
Other Characters:
Hugh Howards
Robert Takiguchi
Tamara Hashioka
Dr. Yuriko Takiguchi
Locations:
S.H.I.E.L.D. Headquarters
Items:
Red Ronin

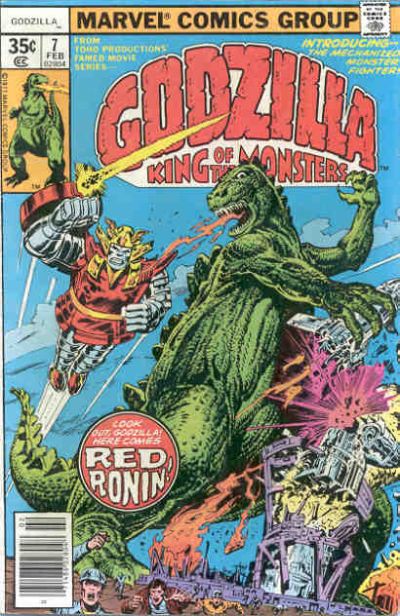
Synopsis for "Birth of a Warrior!"
As Godzilla rampages through a San Diego military base, the situation becomes more serious when Gabriel informs Dum Dum that the monster is slowly moving towards the base's nuclear missile stockpile. While in Detroit, Jimmy is upset for jumping the gun trying to start a romance with Tamara when she rushes in to tell him that she hasn't seen Robert all day. At that moment the Red Ronin robot comes to life and starts walking towards a fuel tank. Jimmy has himself lifted up to the robots head and finds the unconscious Robert inside, removing him from the robots control helmet causes its rampage to stop.
When a call comes in for them to use the Red Ronin, Jimmy finds that he cannot pilot the device as it is unresponsive to his mental commands. While Robert awakens, he sneaks aboard the robot while technicians work on the device. Finding it responds to his mental commands just fine, he commands it to fly him to Godzilla, where it arrives just as the monster reaches the nuclear missile stock pile and is the only thing standing in its way.
Notes
This issue is reprinted in Essential Godzilla, Volume 1.
- Published on
Godzilla Vol 1 #6
Publisher: Marvel Comics
January, 1978
Editor-in-Chief: Archie Goodwin
Cover Artists: Herb Trimpe
"A Monster Enslaved!"
Writers: Doug Moench
Pencilers: Herb Trimpe
Inkers: Herb Trimpe
Colourists: Phil Rache
Letterers: Bruce Patterson
Editors: Archie Goodwin
Appearing in "A Monster Enslaved!"
Featured Characters:
Godzilla
Supporting Characters:
S.H.I.E.L.D.
Godzilla Squad
Gabriel Jones
Jimmy Woo
Timothy "Dum Dum" Dugan
Other Characters:
Hugh Howards (First appearance)
Robert Takiguchi
Tamara Hashioka
Yuriko Takiguchi
Locations:
Hell (Mentioned)
Stark Industries
Items:
Red Ronin (SJ3 RX) (First appearance)
Vehicles:
S.H.I.E.L.D. Hoverflier
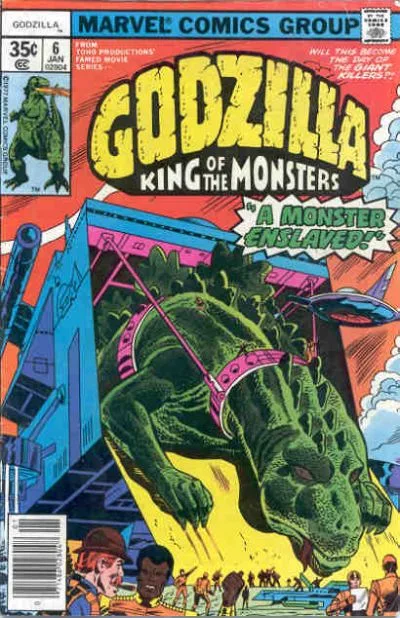

Synopsis for "A Monster Enslaved!"
With a new helicarrier specially designed for capturing Godzilla, SHIELD becomes aware that the monster is sleeping in a cave nearby. While at the Stark plant, Yuriko Takiguchi puts the final touches on his SJ3RX mecha robot, and Jimmy Woo and Tamara Hashioka begin a romance. While young Robert believes that the "Red Ronin" mecha shouldn't be used against Godzilla, but for the creatures benefit decides to do something about the situation.
SHIELD locates the cave where Godzilla is sleeping and fills it with sufficient knockout gas to put the monster out cold, and allows them to load up the creature in the helicarriers' holding container. Meanwhile, Robert enters the Red Ronin armor and puts on its control helmet, the feedback from the device knocks the boy unconscious. While aboard the helicarrier, Godzilla awakens and begins breaking out of the ship.
Notes
This issue is reprinted in Essential Godzilla, Volume 1.
Herb Trimpe returns as the regular artist for the series. Issues #4-5 were pencilled by Tom Sutton.
SJ3 RX will become better known as "Red Ronin" beginning with issue #7.
- Published on
Godzilla Vol 1 #5
Publisher: Marvel Comics
December, 1977
Editor-in-Chief: Archie Goodwin
Cover Artists: Herb Trimpe
"The Isle of Lost Monsters"
Writers: Doug Moench
Pencilers: Tom Sutton
Inkers: Klaus Janson
Colourists: Phil Rache
Letterers: John Costanza
Editors: Archie Goodwin
Appearing in "The Isle of Lost Monsters"
Featured Characters:
Godzilla
Supporting Characters:
S.H.I.E.L.D.
Godzilla Squad
Gabriel Jones
Timothy "Dum Dum" Dugan
Antagonists:
Monster Menagerie (Main story and flashback) (Disbands)
Batragon (Only in flashback)
Ghilaron (Final appearance)
Lepirax (Death)
Centipor (Death)
Doctor Demonicus
Other Characters:
God (Mentioned)
Locations:
Earth (Main story and flashback)
Pacific Ocean (Main story and flashback)
Demonica (Main story and flashback)
Doctor Demonicus' volcano lair (Main story and flashback)
Items:
Lifestone
Vehicles:
S.H.I.E.L.D. Helicarrier
S.H.I.E.L.D. Helicopter

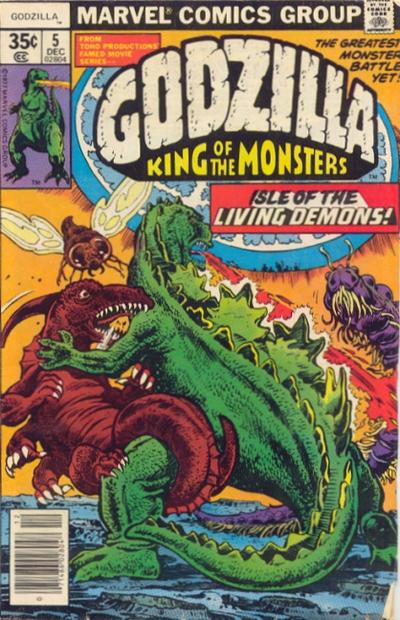
Synopsis for "The Isle of Lost Monsters"
As Godzilla fends off another attack made by SHIELD's Godzilla squad, Demonicus unleashes his other monsters to attack the beast. Realizing there's a complex below, Dum Dum sends Gabriel Jones to investigate. Gabe is captured by Demonicus and his men. Demonicus explains that he was a scientist that was exposed to radiation during an accident, and was deemed unfit to continue practicing. Clearly ignoring his own madness, he learned of the Lifestone which had fallen in the Aleutian Islands. He then constructed this base and created the monsters which are now fighting Godzilla in order to use as weapons for world domination.
When Demonicus is told that his creatures are being killed by Godzilla, Gabe uses the moment to break loose and stop Demonicus. As Godzilla kills the last of Demonicus' monsters, SHIELD destroys his base, captures him and frees the Eskimo tribe under his rule. As Godzilla leaves the scene, Dum Dum begins to wonder just how intelligent Godzilla really is.
Notes
This issue is reprinted in Essential Godzilla, Volume 1.
Doctor Demonicus appears next in Shogun Warriors #12.
Trivia
Lepirax is an analog for the Toho monster Mothra.