- Published on
"Don't you want to look like Jimmy Olsen as much as possible?" - Jackie Oliver
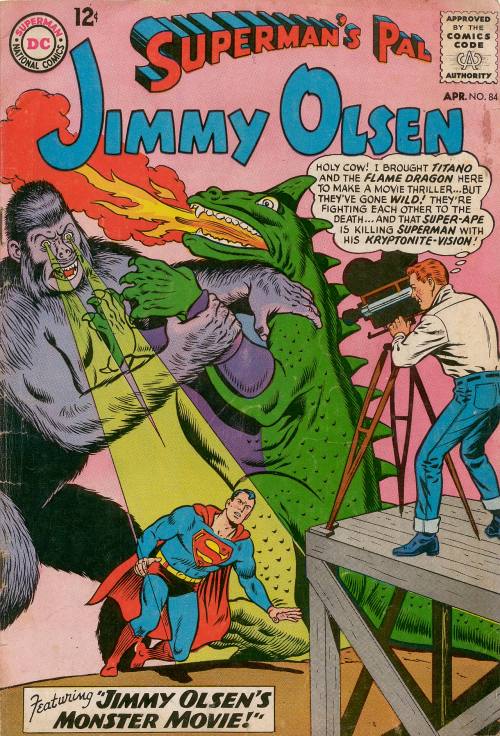
Superman's Pal, Jimmy Olsen Vol 1 #84
April, 1965
Cover Artists: Curt Swan
"Jimmy Olsen's Monster Movie!"
Writers: Jerry Siegel
Pencilers: Curt Swan
Inkers: George Klein
Appearing in "Jimmy Olsen's Monster Movie!"
Featured Characters: Jimmy Olsen (First appearance as Cecil Masterly)
Supporting Characters: Lucy Lane (First appearance as Joan)
Perry White
Professor Potter (First appearance as Dr. Krawl)
Superman (First appearance as Nitkoff)
Antagonists: Flame-Dragon
Titano
Other Characters: Ako (Mentioned only)
Ron Wyck
Watugi Tribe, Chief
Locations: Allura (Mentioned only)
Metropolis, Daily Planet
Pajor-Pajor, Ookali
Prehistoric Past (Mentioned only)
Items: Gas-Gun (Destroyed)
Time-And-Space Warper

Synopsis for "Jimmy Olsen's Monster Movie!"
A Hollywood movie producer challenges Jimmy to come up with a horror movie. To help things along, Jimmy teleports Titano and a Kryptonian flame-dragon to an island to have a fight.
"Jimmy Olsen's Day of Disgrace!"
Writers: Leo Dorfman
Pencilers: John Forte
Inkers: John Forte
Appearing in "Jimmy Olsen's Day of Disgrace!"
Featured Characters: Jimmy Olsen
Supporting Characters: Clark Kent
Jimmy Olsen Fan Club - Plim
Lois Lane
Lucy Lane
Perry White
Antagonists: Al Kimbo
Bruiser Barnes
Rocky Steele
Other Characters: Antronians (Flashback only)
Kilban (Mentioned only)
Cinderella (Mentioned only)
Julius Caesar (Mentioned only)
Metropolis Police Department
Napoleon (Mentioned only)
Professor Potter (Mentioned only)
Locations: Antron (Flashback only)
Earth - Metropolis - Bank, Broadway Warehouse, Daily Planet, Metropolis Prison (Mentioned only)
Items: Daily Planet
News Machine
Signal-Watch
Snork
Vehicles: Spaceship
Synopsis for "Jimmy Olsen's Day of Disgrace!"
When Jimmy is given the duties of newsboy by Perry White to teach him some humility, a fan of his from another planet helps him nab some crooks.
"Jimmy Olsen's Female Fan!"
Writers: Otto Binder
Pencilers: George Papp
Inkers: George Papp
Appearing in "Jimmy Olsen's Female Fan!"
Featured Characters: Jimmy Olsen (First appearance as Jackie Oliver)
Supporting Characters: Jimmy Olsen Fan Club - Ed Dunn, Dick Selby, Hank White, Harry Halsted (Quits team), Joe Bogg, Tom Tommy Todd
Other Characters: Army (Mentioned only)
Bizarro-Jimmy (Mentioned only)
Clark Kent (In a photograph only) (Statue only)
Lois Lane (In a photograph only) (Statue only)
Lucy Lane (In a photograph only)
Perry White (In a photograph only) (Statue only)
Professor Potter (In a photograph only)
Superman (In a photograph only)
Locations: Bizarro World (Mentioned only)
Metropolis, Daily Planet (Mentioned only), Junkyard
Items: Larynxophone
Superman Signal-Watches
Synopsis for "Jimmy Olsen's Female Fan!"
The president of the Jimmy Olsen Fan Club moves away, and Jimmy declares the others must choose a new president by competition, with exhibits. Then he masquerades as the first female applicant to the club, passes initiation, and is apparently chosen "president" by Jimmy. But Tommy Todd sees through her imposture, and is thus chosen as president by Jimmy.
- Published on
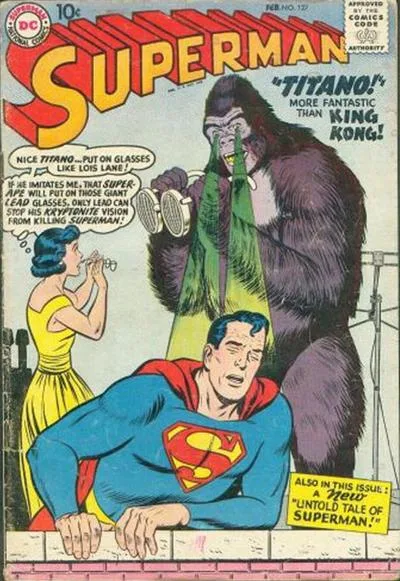
Superman Vol 1 #127
February, 1959
Executive Editor: Whitney Ellsworth
Cover Artists: Curt Swan, Stan Kaye
"Titano the Super-Ape"
Writers: Otto Binder
Pencilers: Wayne Boring
Editors: Mort Weisinger
Appearing in "Titano the Super-Ape"
Featured Characters:
Superman
Supporting Characters:
Lois Lane
Antagonists:
Titano (First appearance)
Locations:
Metropolis
Items:
Green Kryptonite
Uranium

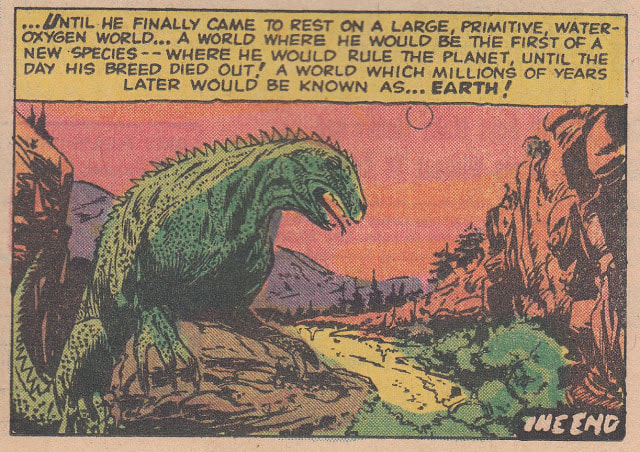
Synopsis for "Titano the Super-Ape"
During a televised talent show, Lois Lane has Superman show off his ability to turn coal into diamonds, and then introduces a new act: Toto the monkey. After Toto shows off his proficiency with numbers, Lois easily befriends the ape when she cleans him up after he's struck by a pie thrown by a comedy routine. Toto's owner then tells Lois to join them at the Cape Rocket Range where Toto is going to be launched into space in a satellite as part of a publicity stunt.
Lois and Superman both show up, and when the rocket doesn't launch, the Man of Steel lends a helping hand. while in space, Toto's satellite passes two meteors, one made of Uranium and the other Kryptonite colliding, their energies bombarding Toto. Upon arriving on Earth, Toto appears alive an well, but suddenly grows to a gigantic size. Renamed Titano by Lois Lane, the creature captures her. When Superman tries to save her, he finds that the creature can fire beams of Kryptonite energy from it's eyes, weakening the hero.
Stuck as Titano's prisoner, Lois can only witness as Titano causes mischief and unintentional destruction of property. Using a lead shield, Superman manages to save Lois Lane, but the hero is still hard pressed over what to do about Titano. Trapping the creature in a cage, it still poses a threat to the Man of Steel due to its Kryptonite vision. Superman soon learns that the creature will try to imitate anything that Lois does, and so the two trick the gigantic ape into putting on a pair of specially made glasses that block its Kryptonite vision. Superman then sends Titano through the time barrier to prehistoric Earth, where the gigantic ape can live a happy life
Superman Vol 1 #138
July, 1960
Cover Artists: Curt Swan, Stan Kaye
Titano the Super-Ape!
Writers: Otto Binder
Pencilers: Wayne Boring
Inkers: Stan Kaye
Editors: Mort Weisinger
Appearing in "Titano the Super-Ape!"
Featured Characters:
Superman (Flashback and main story)
Supporting Characters:
Lois Lane (Flashback and main story)
Jimmy Olsen
Perry White
Antagonists:
Titano (Flashback and main story)
Other Characters:
Dinosaurs
Superman Robot
Locations:
Metropolis
Daily Planet Building
Fortress of Solitude
Items:
Green Kryptonite (Flashback only)
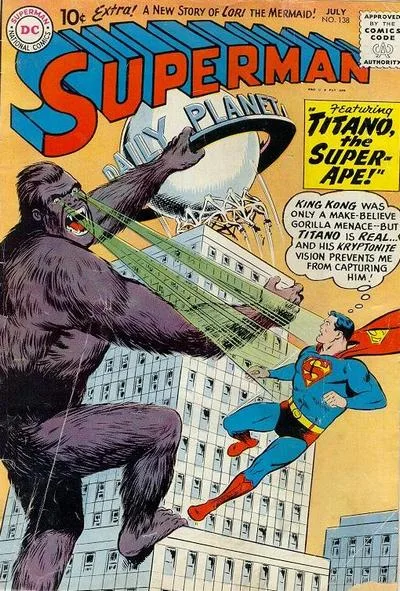

Synopsis for "Titano the Super-Ape!"
At his Fortress of Solitude, Superman looks at his time monitor to check up on Titano in Earth's distant past. To his surprise, the creature suddenly vanishes from sight and reappears in modern day Metropolis. As the gigantic ape terrorizes the city, Superman's initial attack is rebuffed due to the super-ape's Kryptonite vision. As it captures Lois Lane, Superman puts on his specially built lead suit to battle the beast.
The lead suit only proves to be a temporary protection as Superman flies too fast and the wind resistance causes the suit to melt away. After following Titano for a time, fixing the damage that he does, Superman realizes that Titano seems to be going for spherical objects. The Man of Steel then realizes that Titano was collecting a series of spheres in the Earth's past. Traveling back in time, Superman finds that they are some kind of gigantic coconut type fruit. Bringing one to the present, Titano begins to break it open and drink its contents.
This distracts the super-beast enough for Superman to save Lois Lane and then knock Titano back through the time barrier returning him to the past era where Superman had originally placed him.
- Published on
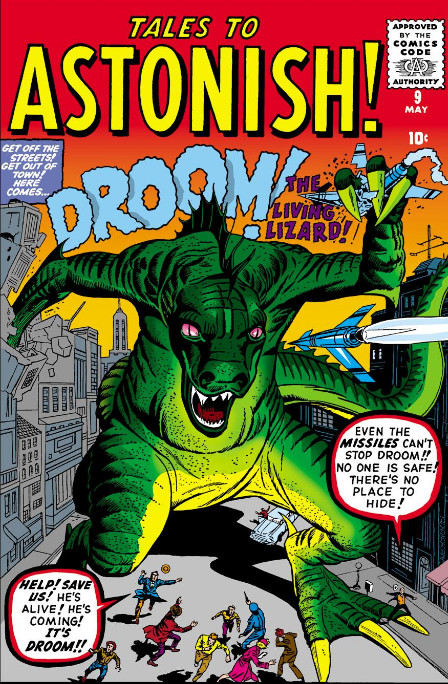
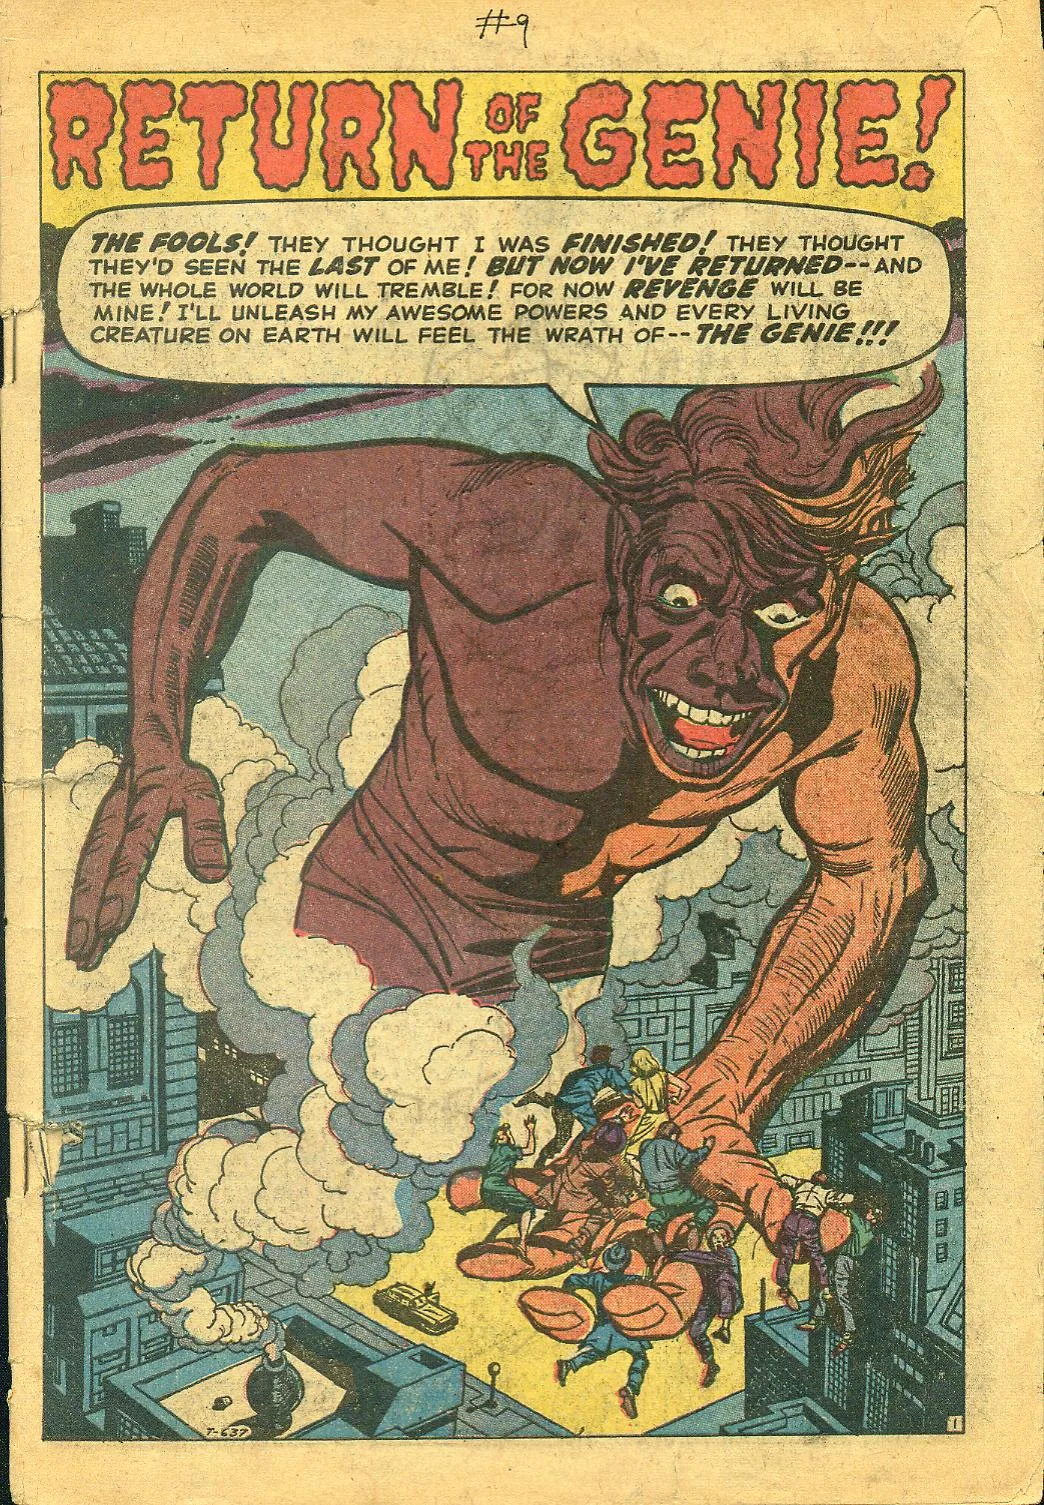
Tales to Astonish Vol 1 #9
May, 1960
Editor-in-Chief: Stan Lee
Cover Artists: Jack Kirby, Dick Ayers, Stan Goldberg, Artie Simek
"Return of the Genie!"
Writers: Stan Lee
Pencilers: Jack Kirby
"No Way Out"
Pencilers: Steve Ditko
Inkers: Steve Ditko
"I Saw Droom the Living Lizard!"
Pencilers: Don Heck
"Fangs of the Bear"
Pencilers: Doug Wildey

Appearing in "Return of the Genie!"
Featured Characters: Freddy Sykes (The Genie) (Last appearance)
Other Characters: Genie (Only in flashback)
Locations: Earth, United States of America, New York, New York City, Illinois, Chicago, Michigan, Detroit, Swamp, Europe, Asia, Moon
Items: Bottle
Synopsis for "Return of the Genie!"
The genie from last issue's Kirby story returns again when a man uncorks his muddy bottle from the swamp and discards it because he cannot see the genie inside. Since the genie has no master, he is free to do whatever he wishes and he enslaves the Earth. Growing bored, he sets his sights on the stars, but finds once he passes Earth's atmosphere, his powers fade and he winds up back in the bottle again watching the man approach. This time, the genie thinks, he knows his mistake and won't overreach, but the man turns away and leaves without uncorking the bottle.
Appearing in "No Way Out"
Featured Characters: Doctor Harris
Supporting Characters: Amy
Other Characters: NASA
Locations: Earth, Just beyond Pluto
Vehicles: Spaceship
Synopsis for "No Way Out"
In the 21st century mankind finds that there is a barrier out beyond Pluto that prevents any further space travel, keeping humanity confined to the solar system like goldfish in a bowl.

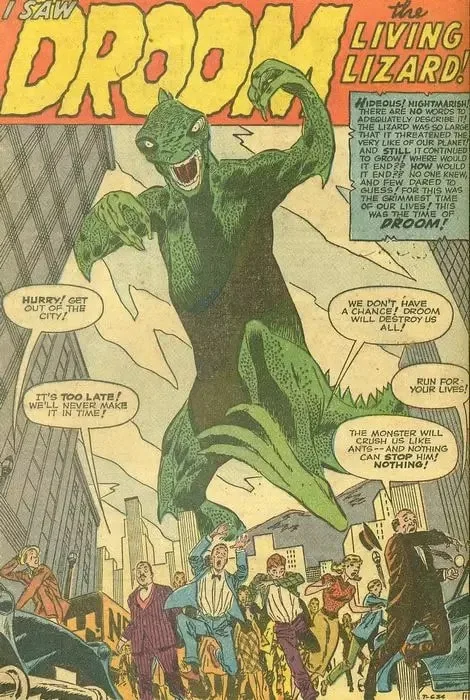
Appearing in "I Saw Droom the Living Lizard!"
Featured Characters: Droom (First appearance)
Supporting Characters: Henry Gordon, U.S. Army
Other Characters: Dr. Jonhson (Mentioned), Droom (Only appearance)
Locations: Earth-616, Earth-60059 (Only appearance)
Items: Growth Serum
Synopsis for "I Saw Droom the Living Lizard!"
The creature Droom started life as a regular reptile called Droomedia Rex and was supposedly one of the most vicious reptiles.
A scientist created a growth serum that increased the size of fruits and vegetables and wanted to show his findings to his friend who was a curator at a local museum. The curator had the Droomedia Rex reptile in his box when it escaped while the two men were talking about the growth serum. The lizard knocked over a vile and the growth serum splashed all over the reptile.
The creature started growing and growing until it reached a height of mountains. Droom started destroying the town and the local police and militia could not stop it. The Air Force tried to stop Droom with a nuclear bomb but that failed when the creature snatched the plane from the sky.
The military devised Plan X which involved thousands of soldiers. These men attached rockets that were powered by solar energy to Droom's feet as it was distracted by fighter jets. The military activated the countdown and Droom was launched into space where it stopped growing and drifted aimlessly in suspended animation.
Appearing in "Fangs of the Bear"
Featured Characters: Scientist
Supporting Characters: Bobby
Locations: United States of America
Items: Robot Bear
Synopsis for "Fangs of the Bear"
A man develops a robot teddy bear controlled through telepresence for the purpose of stealing from those who buy the toy. When a poor man buys the toy for his crippled son who loves the gift profusely, the inventor tries to recall the robot in order to get it sold to someone wealthy, but the controls do not respond. He takes a gun and resolves to go to their house and remove it himself, but when he arrives and threatens the family, the bear attacks him even though there is no one at the controls.
Notes
- "Return of the Genie!" is reprinted in Vault of Evil #11.
- "No Way Out" is reprinted in Where Monsters Dwell #34.
- "I Saw Droom the Living Lizard!" is reprinted in Fantasy Masterpieces #8.
- "Fangs of the Bear" is reprinted in Crypt of Shadows #13.
- Published on
Cover to Blue Devil #15

With a new film coming and current comic book from BOOM! Studios King Kong is quite popular but he has been part of the comic book world more then some my realize. Some of those apprearances came from Marvel and DC Comics, Kong made multiple appearances in the Marvel Universe, one as a giant robot ape called "Kong" appeared in Nick Fury, Agent of SHIELD #2 in 1969, drawn to look exactly like the famous movie monster. The character Warlock from The New Mutants turned into Godzilla and then King Kong (one of those interesting trivia fact) during a rampage through New York City in Web of Spider-Man Annual No. 2 from 1986. In Webspinners: Tales of Spider-Man No. 1 from 1999, Peter Parker is seen watching the film King Kong at a cinema alongside Quentin Beck. He would return to watch the film again in issue #3.
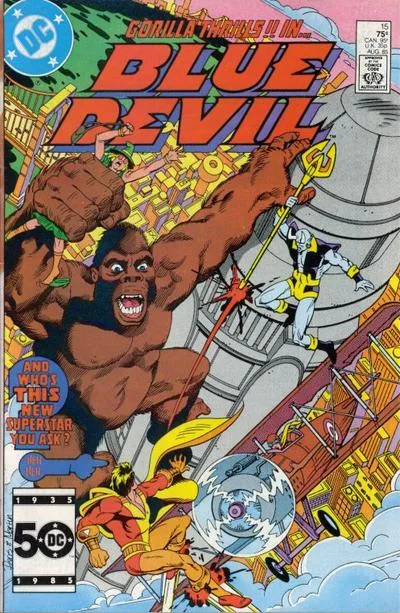
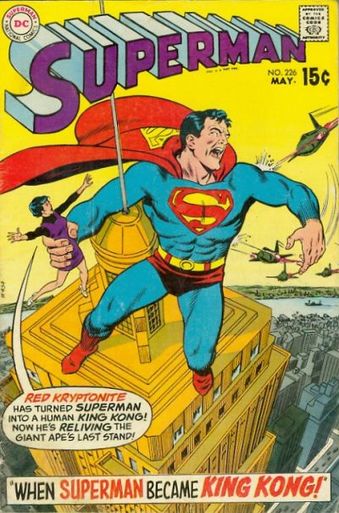
For DC, he appeared via a poster in 1961's Adventure Comics #289. In that comic's back-up strip called Tales of the Bizarro World, Bizarro encounters Titano on Earth's prehistoric past. When he returns to his home world, he's inspired to make a TV series based on the character only to be accused of ripping off King Kong. King Kong appeared as a statue in Superman's Girl Friend Lois Lane No. 73 in 1967 and as a robot brought to life (among other giant robots in an amusement park created by Toyman) to fight Superman in Adventures of Superman No. 475 in 1991. In issue No. 226 of Superman in 1970, Clark Kent is seen watching the film King Kong at a Metropolis cinema and after being exposed to Red Kryptonite (as Superman) grows into a giant who rampages through the city in a story called When Superman became King Kong!. In issue No. 120 of Weird War Tales from 1983, G.I. Robot encounters a giant female ape referred to as "Mrs. King Kong" on Dinosaur Island who saves him and his allies from a Tyrannosaurus. In 1985's Blue Devil No. 15, Blue Devil battles a giant robot King Kong that malfunctions at the "King Kong Attraction" located at the "Verner Bros" studio in Hollywood.
For DC, he appeared via a poster in 1961's Adventure Comics #289. In that comic's back-up strip called Tales of the Bizarro World, Bizarro encounters Titano on Earth's prehistoric past. When he returns to his home world, he's inspired to make a TV series based on the character only to be accused of ripping off King Kong. King Kong appeared as a statue in Superman's Girl Friend Lois Lane No. 73 in 1967 and as a robot brought to life (among other giant robots in an amusement park created by Toyman) to fight Superman in Adventures of Superman No. 475 in 1991. In issue No. 226 of Superman in 1970, Clark Kent is seen watching the film King Kong at a Metropolis cinema and after being exposed to Red Kryptonite (as Superman) grows into a giant who rampages through the city in a story called When Superman became King Kong!. In issue No. 120 of Weird War Tales from 1983, G.I. Robot encounters a giant female ape referred to as "Mrs. King Kong" on Dinosaur Island who saves him and his allies from a Tyrannosaurus. In 1985's Blue Devil No. 15, Blue Devil battles a giant robot King Kong that malfunctions at the "King Kong Attraction" located at the "Verner Bros" studio in Hollywood.

Web of Spider-Man Annual No. 2

Superman #226

Superman #226

Nick Fury, Agent of SHIELD #2

Web of Spider-Man Annual No. 2

- Published on
Godzilla: Kingdom of Monsters #1
Written by Eric Powell, Tracy Marsh
Art by Phil Hester (Pencils), Bruce McCorkindale (Inks)
Colors by Ronda Pattison
Letters by Chris Mowry
Edits by Chris Ryall, Bobby Curnow (Associate editor), Carlos Guzman (Assistant editor)
Creative Consultant: Chris Mowry
Published by IDW
Cover A: Alex Ross
Cover B: Eric Powell
Retailer Incentive Cover: Eric Powell
Retailer Exclusive Cover: Matt Frank
Godzilla: Kingdom of Monsters #1 is the first issue of Godzilla: Kingdom of Monsters. It was released on March 30, 2011.
Description
"The King of the Monsters rises again, and for the first time in comics, he's bringing lots of other beloved Toho monsters with him in one destructive saga, and The Goon's Eric Powell is sounding the alarm."
Plot
In Japan, a boy and girl play on a beach littered with dead fish. Godzilla suddenly appears, seemingly devouring the two youths. Meanwhile, their father, a fisherman, sees the commotion and is concerned for his children.
Godzilla comes ashore, and the Japanese military sends out fighter jets. Failing to subdue the monster with these means, the Prime Minister orders a nuclear attack. This however only grants Godzilla atomic breath. The beast continues onward into Tokyo, reducing it to rubble. Shortly, in America, President Ogden is made aware of Godzilla.
Appearances
Monsters: Godzilla
Anguirus (Cover B)
King Ghidorah (Cover B)
Kumonga (Cover B)
Mothra Larva (Cover B)
Rodan (Cover B)
Weapons, Vehicles, and Races: Japanese military
Characters: President Ogden
Isamu
Kameko
Isamu & Kameko's father
Locations: Tokyo, Japan
Washington D.C., United States
Trivia
Godzilla: Kingdom of Monsters #1 has the most covers of any Godzilla comic or manga ever, with 80.


- Published on
"Am I to waste this day with such encounters?! Must I tear this valley from its roots before it yield what I have come to claim?!" - The Giant
Devil Dinosaur Vol 1 #3
June, 1978
Editor-in-Chief: Jim Shooter
Cover Artists: Jack Kirby
"Giant"
Writers: Jack Kirby
Pencilers: Jack Kirby
Inkers: Mike Royer
Colourists: Petra Goldberg
Letterers: Mike Royer
Editors: Jack Kirb
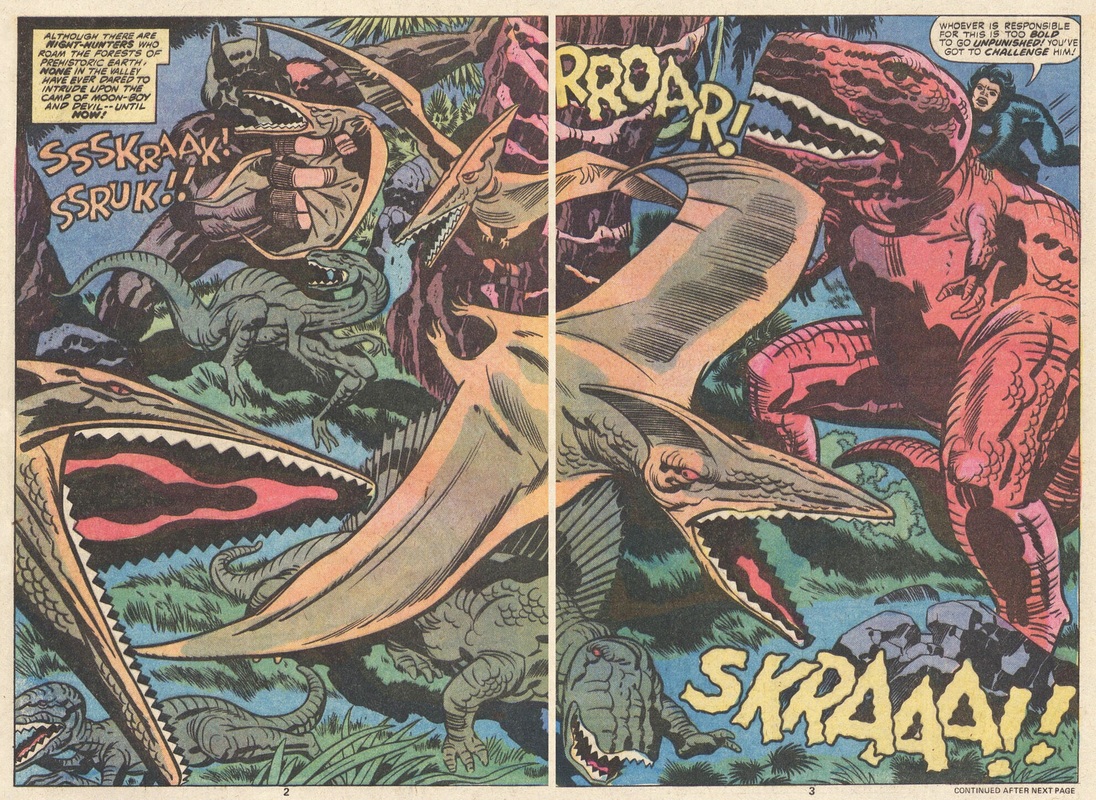
Appearing in "Giant"
Featured Characters: Devil Dinosaur
Moon Boy
Villains: The Big Ones
The Giant (Only Appearance)
Ruka (Only Appearance)
Thunder-Horn
Bone-Back
Other Characters: Small-folk (Mentioned)
Locations: Earth-78411
Dinosaur World
Valley of the Flame
Synopsis for "Giant"
After being woken up in the middle of night by a loud strange sound, Devil Dinosaur and Moon Boy go to investigate a strange figure whose encouraged on them sleeping. After giving chase, a giant rock is hurled at Devil throwing him off balance, a feat which no living creature should be able to do. Continuing the search Moon-Boy sees a figure that is bipedal with a Thunder-Horn Head. The next morning Moon-Boy leaves alone and finds the figure, turning out to be a Giant humanoid wearing a mask, fighting Bone-Back. After defeating Bone-Back, the Giant calls out Ruka and Moon-Boy attempts to leave but is captured by another figure. Meanwhile, Devil Dinosaur has discovered Moon Boys disappearance and follows a trail of dinosaur body's to the Giant. When he meets up with The Giant, a battle ensues but both seem equally matched so Devil attempts to lure The Giant to a bog. The Figure who captured Moon Boy is revealed to be a much smaller Giant figure, escaping his captive Moon Boy leads the younger Giant to the same bog that Devil is at, just as the Giant is tricked into falling in. Moon Boy then reveals that Th younger giant is the other ones cub and they proceed to rescue the giant from the bog and he leaves with his son in arms, with a truce between the Big Ones and Devil Dinosaur been formed.
Devil Dinosaur Vol 1 #3
June, 1978
Editor-in-Chief: Jim Shooter
Cover Artists: Jack Kirby
"Giant"
Writers: Jack Kirby
Pencilers: Jack Kirby
Inkers: Mike Royer
Colourists: Petra Goldberg
Letterers: Mike Royer
Editors: Jack Kirb
Appearing in "Giant"
Featured Characters: Devil Dinosaur
Moon Boy
Villains: The Big Ones
The Giant (Only Appearance)
Ruka (Only Appearance)
Thunder-Horn
Bone-Back
Other Characters: Small-folk (Mentioned)
Locations: Earth-78411
Dinosaur World
Valley of the Flame
Synopsis for "Giant"
After being woken up in the middle of night by a loud strange sound, Devil Dinosaur and Moon Boy go to investigate a strange figure whose encouraged on them sleeping. After giving chase, a giant rock is hurled at Devil throwing him off balance, a feat which no living creature should be able to do. Continuing the search Moon-Boy sees a figure that is bipedal with a Thunder-Horn Head. The next morning Moon-Boy leaves alone and finds the figure, turning out to be a Giant humanoid wearing a mask, fighting Bone-Back. After defeating Bone-Back, the Giant calls out Ruka and Moon-Boy attempts to leave but is captured by another figure. Meanwhile, Devil Dinosaur has discovered Moon Boys disappearance and follows a trail of dinosaur body's to the Giant. When he meets up with The Giant, a battle ensues but both seem equally matched so Devil attempts to lure The Giant to a bog. The Figure who captured Moon Boy is revealed to be a much smaller Giant figure, escaping his captive Moon Boy leads the younger Giant to the same bog that Devil is at, just as the Giant is tricked into falling in. Moon Boy then reveals that Th younger giant is the other ones cub and they proceed to rescue the giant from the bog and he leaves with his son in arms, with a truce between the Big Ones and Devil Dinosaur been formed.

- Published on
"Don't just stand there helpless, ya lamebrained yahoos! Least ya can do is start cussin', like me!" - "Dum Dum" Dugan
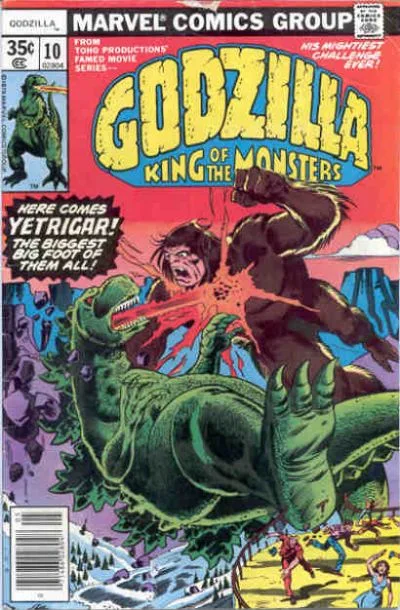
Godzilla Vol 1 #10
May, 1978
Editor-in-Chief: Archie Goodwin
Cover Artists: Herb Trimpe
"Godzilla Vs Yetrigar"
Writers: Doug Moench
Pencilers: Herb Trimpe
Inkers: Fred Kida
Colourists: Mary Titus
Letterers: John Costanza
Editors: Archie Goodwin
Appearing in "Godzilla Vs Yetrigar"Edit
Featured Characters: Godzilla
Supporting Characters: S.H.I.E.L.D.
Godzilla Squad
Gabriel Jones
Jimmy Woo
Timothy "Dum Dum" Dugan
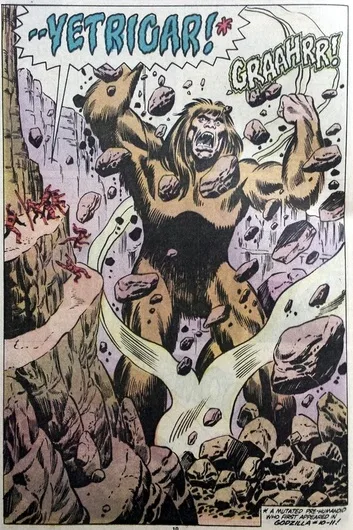
Villains: Yetrigar (First appearance)
Other Characters: Robert Takiguchi
Tamara Hashioka
Jeff
Jillian
Johnny
Mary
Ron
Locations: Arizona
Grand Canyon
Canada
Alberta
Items: Red Ronin
Vehicles: S.H.I.E.L.D. Helicarrier
Godzilla Vol 1 #10
May, 1978
Editor-in-Chief: Archie Goodwin
Cover Artists: Herb Trimpe
"Godzilla Vs Yetrigar"
Writers: Doug Moench
Pencilers: Herb Trimpe
Inkers: Fred Kida
Colourists: Mary Titus
Letterers: John Costanza
Editors: Archie Goodwin
Appearing in "Godzilla Vs Yetrigar"Edit
Featured Characters: Godzilla
Supporting Characters: S.H.I.E.L.D.
Godzilla Squad
Gabriel Jones
Jimmy Woo
Timothy "Dum Dum" Dugan
Villains: Yetrigar (First appearance)
Other Characters: Robert Takiguchi
Tamara Hashioka
Jeff
Jillian
Johnny
Mary
Ron
Locations: Arizona
Grand Canyon
Canada
Alberta
Items: Red Ronin
Vehicles: S.H.I.E.L.D. Helicarrier
Synopsis for "Godzilla Vs Yetrigar"
Three months ago
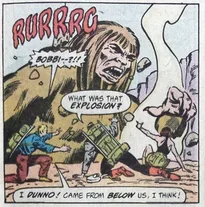
An underground nuclear test is conducted by the US Department of Defense in Arizona, but yields some unforeseen side-effects. The radiation from the test is channeled into an underground rift, a subterranean passage stretching from Arizona to Alberta, Canada. In Alberta, the radiation comes to fill an ice cave, within which a hairy, near-human creature is encased in a glacial tomb, one of the legendary Sasquatch. The Sasquatch is freed from the ice by the radioactivity and revived. The newly revived monster is pained by the continuing effects of the radiation on his body. His mind filled with rage, the bigfoot turns south, towards where he instinctively senses the source of his affliction originates. As he strides southward, however, the radiation begins to make the man-monster start to grow.
The present
The S.H.I.E.L.D. Helicarrier follows the trail of Godzilla from Las Vegas, Nevada to the Grand Canyon in Arizona. Gabe Jones has reservations about using S.H.I.E.L.D. ordnance in the canyon, but Dugan scoffs, calling him a monster-lover. They finally locate Godzilla, but when they do, they also witness the gigantic Big Foot known as a Yetrigar. Hurling a huge boulder at the S.H.I.E.L.D. Helicarrier, Behemoth, Yetrigar takes S.H.I.E.L.D. out of the action. On the bridge of the Helicarrier, Robbie Takiguchi sneaks past the scrambling S.H.I.E.L.D. agents and gains access to the Red Ronin battlesuit. He hopes to intervene on Godzilla's behalf in his battle against Yetrigar.
Yetrigar ambushes Godzilla at the rim of the Grand Canyon, causing both monsters to topple into the natural wonder. The fall doesn't give them pause however, and they continue clawing and biting at one another. Godzilla blasts Yetrigar with his flame breath, but Yetrigar deflects it with a giant boulder. Godzilla maintains the upper hand though as he batters Yetrigar with his tail, then chomps down on his arm. Yetrigar frees his arm then punches Godzilla across the snout. The battle soon escalates when Red Ronin arrives to prevent the monsters from killing each other.
Three months ago
An underground nuclear test is conducted by the US Department of Defense in Arizona, but yields some unforeseen side-effects. The radiation from the test is channeled into an underground rift, a subterranean passage stretching from Arizona to Alberta, Canada. In Alberta, the radiation comes to fill an ice cave, within which a hairy, near-human creature is encased in a glacial tomb, one of the legendary Sasquatch. The Sasquatch is freed from the ice by the radioactivity and revived. The newly revived monster is pained by the continuing effects of the radiation on his body. His mind filled with rage, the bigfoot turns south, towards where he instinctively senses the source of his affliction originates. As he strides southward, however, the radiation begins to make the man-monster start to grow.
The present
The S.H.I.E.L.D. Helicarrier follows the trail of Godzilla from Las Vegas, Nevada to the Grand Canyon in Arizona. Gabe Jones has reservations about using S.H.I.E.L.D. ordnance in the canyon, but Dugan scoffs, calling him a monster-lover. They finally locate Godzilla, but when they do, they also witness the gigantic Big Foot known as a Yetrigar. Hurling a huge boulder at the S.H.I.E.L.D. Helicarrier, Behemoth, Yetrigar takes S.H.I.E.L.D. out of the action. On the bridge of the Helicarrier, Robbie Takiguchi sneaks past the scrambling S.H.I.E.L.D. agents and gains access to the Red Ronin battlesuit. He hopes to intervene on Godzilla's behalf in his battle against Yetrigar.
Yetrigar ambushes Godzilla at the rim of the Grand Canyon, causing both monsters to topple into the natural wonder. The fall doesn't give them pause however, and they continue clawing and biting at one another. Godzilla blasts Yetrigar with his flame breath, but Yetrigar deflects it with a giant boulder. Godzilla maintains the upper hand though as he batters Yetrigar with his tail, then chomps down on his arm. Yetrigar frees his arm then punches Godzilla across the snout. The battle soon escalates when Red Ronin arrives to prevent the monsters from killing each other.
Notes
This issue is reprinted in Essential Godzilla, Volume 1.
First appearance of Yetrigar. Yetrigar appears next in Godzilla #11.
Trivia
The tagline for this issue is "Here Comes Yetrigar! The Biggest Big Foot of them All!"
The name "Yetrigar" is taken from Japanese folklore and refers to a mythological race of Yeti.
- Published on
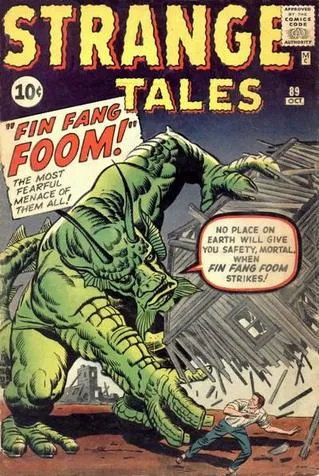
Strange Tales Vol 1 #89
October, 1961
Editor-in-Chief: Stan Lee
Cover Artists: Jack Kirby, Dick Ayers
Fin Fang Foom!
Writers : Stan Lee
Pencilers : Jack Kirby
Inkers : Dick Ayers
Editors : Stan Lee
The Green Things!
Writers: Steve Ditko
Pencilers: Steve Ditko
Inkers: Steve Ditko
Editors: Stan Lee
The Touch of Midas!
Pencilers: Paul Reinman
Inkers: Paul Reinman
Editors: Stan Lee
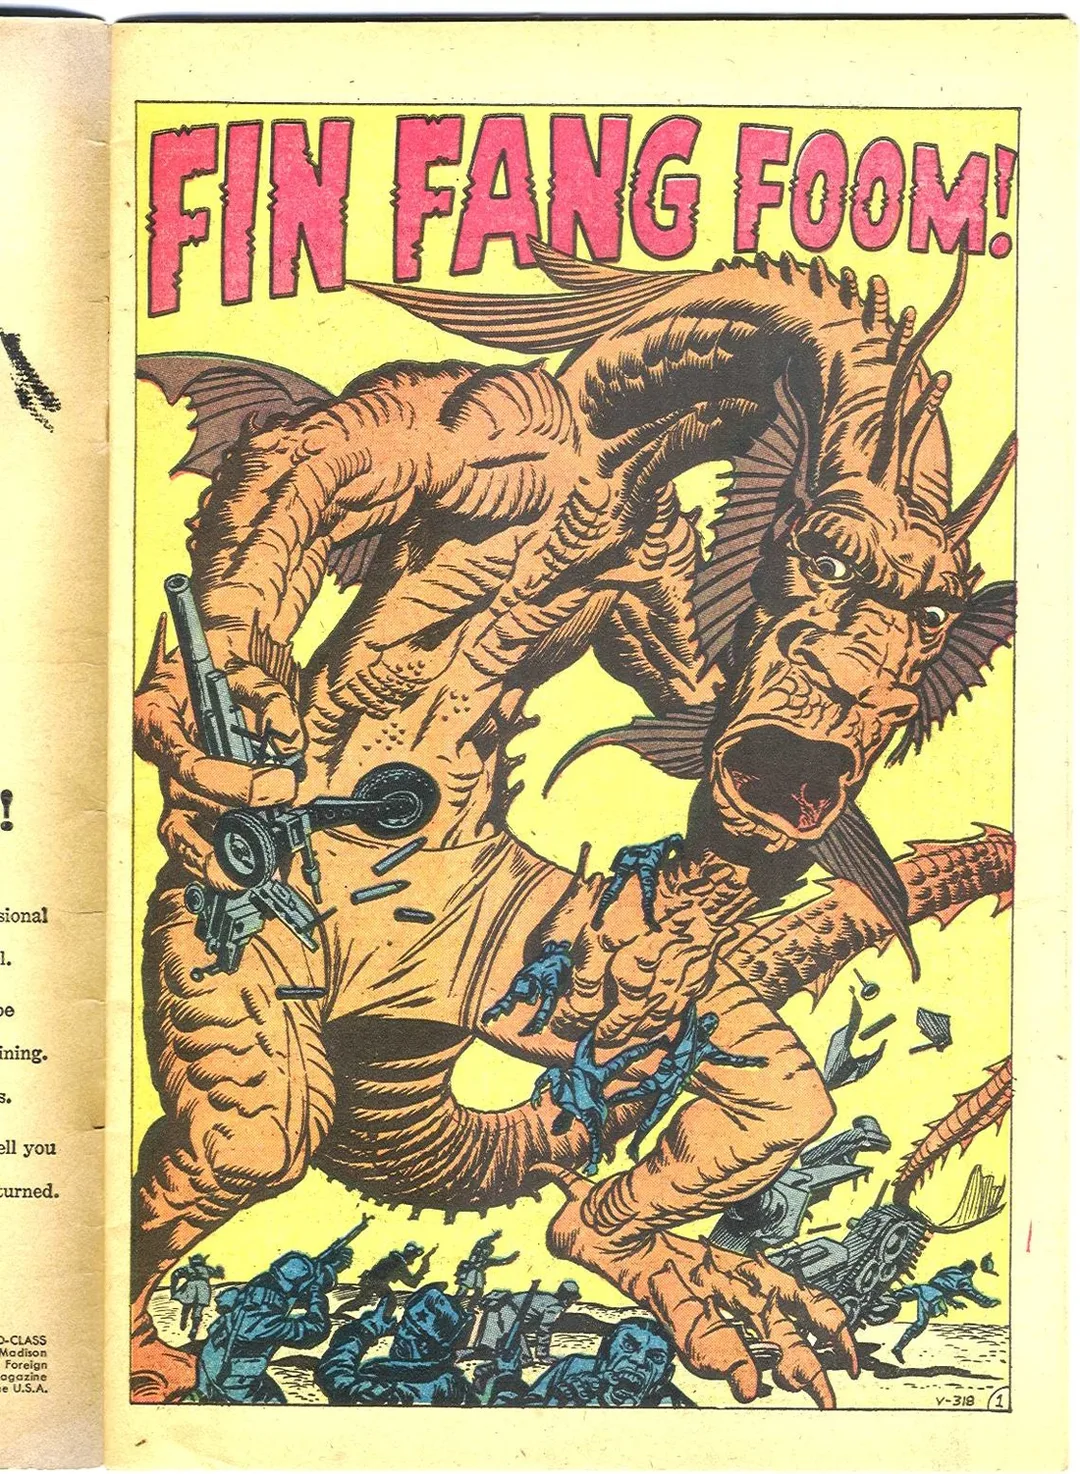
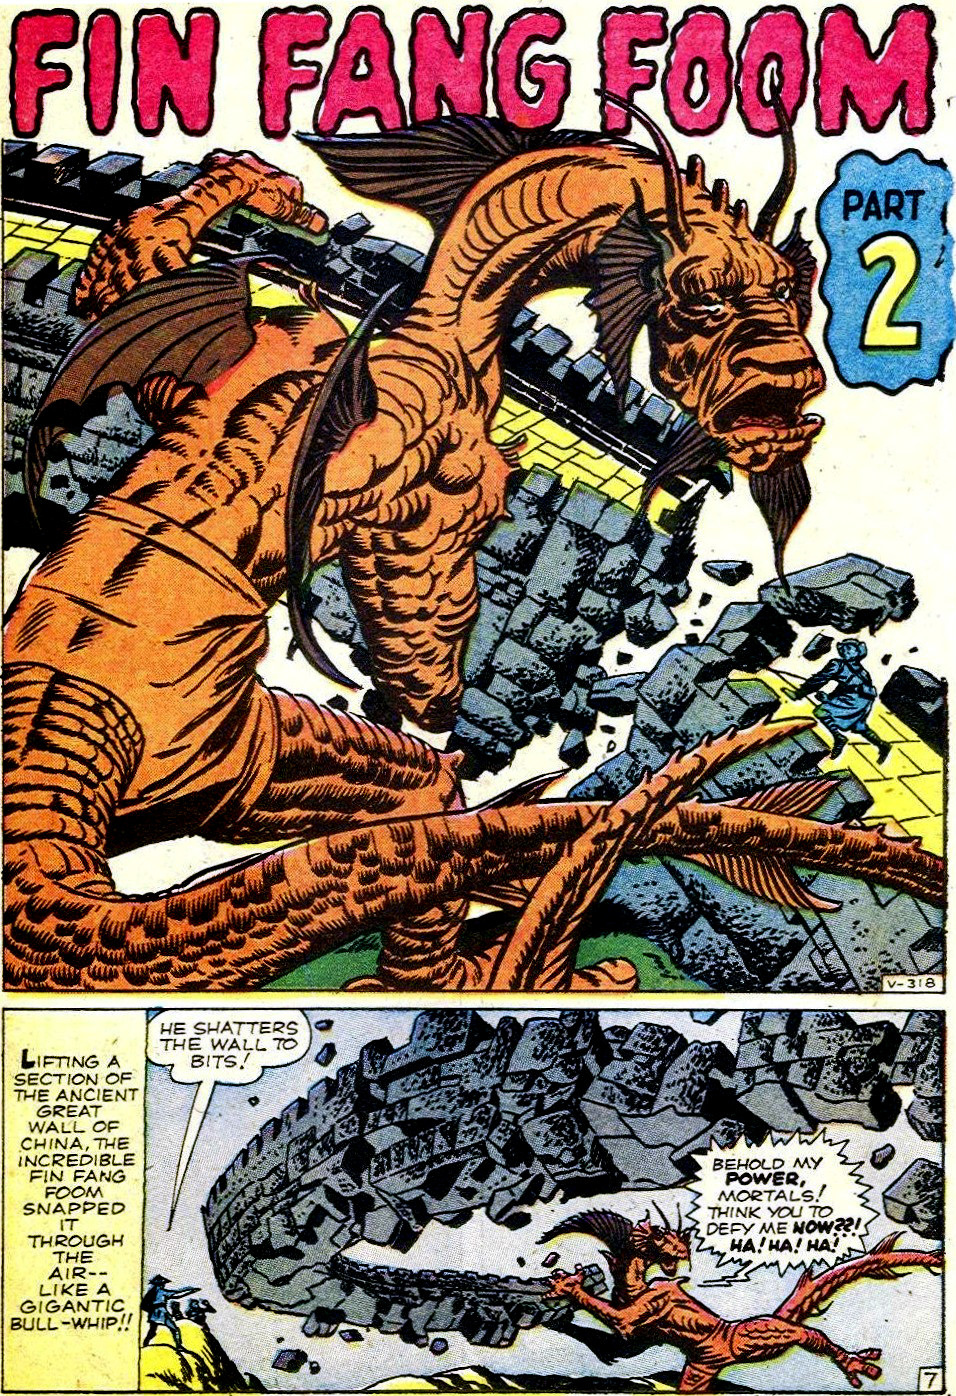
Appearing in "Fin Fang Foom!"
Featured Characters: Fin Fang Foom (First appearance)
Supporting Characters:Chan Liuchow
Locations: China
Synopsis for "Fin Fang Foom!"
Fin Fang Foom is deliberately awakened from his slumber in a tomb by teenager Chen Liuchow, whose homeland is under threat from the Communist Chinese.
Liuchow taunts Foom with the threat of the sleep herb, goading the dragon into chasing him, and leads him straight into the Communist camp, which Foom decimates.
Liuchow subsequently leads Fin Fang Foom back into his tomb, where the application of the herb returns Foom to his sleep.

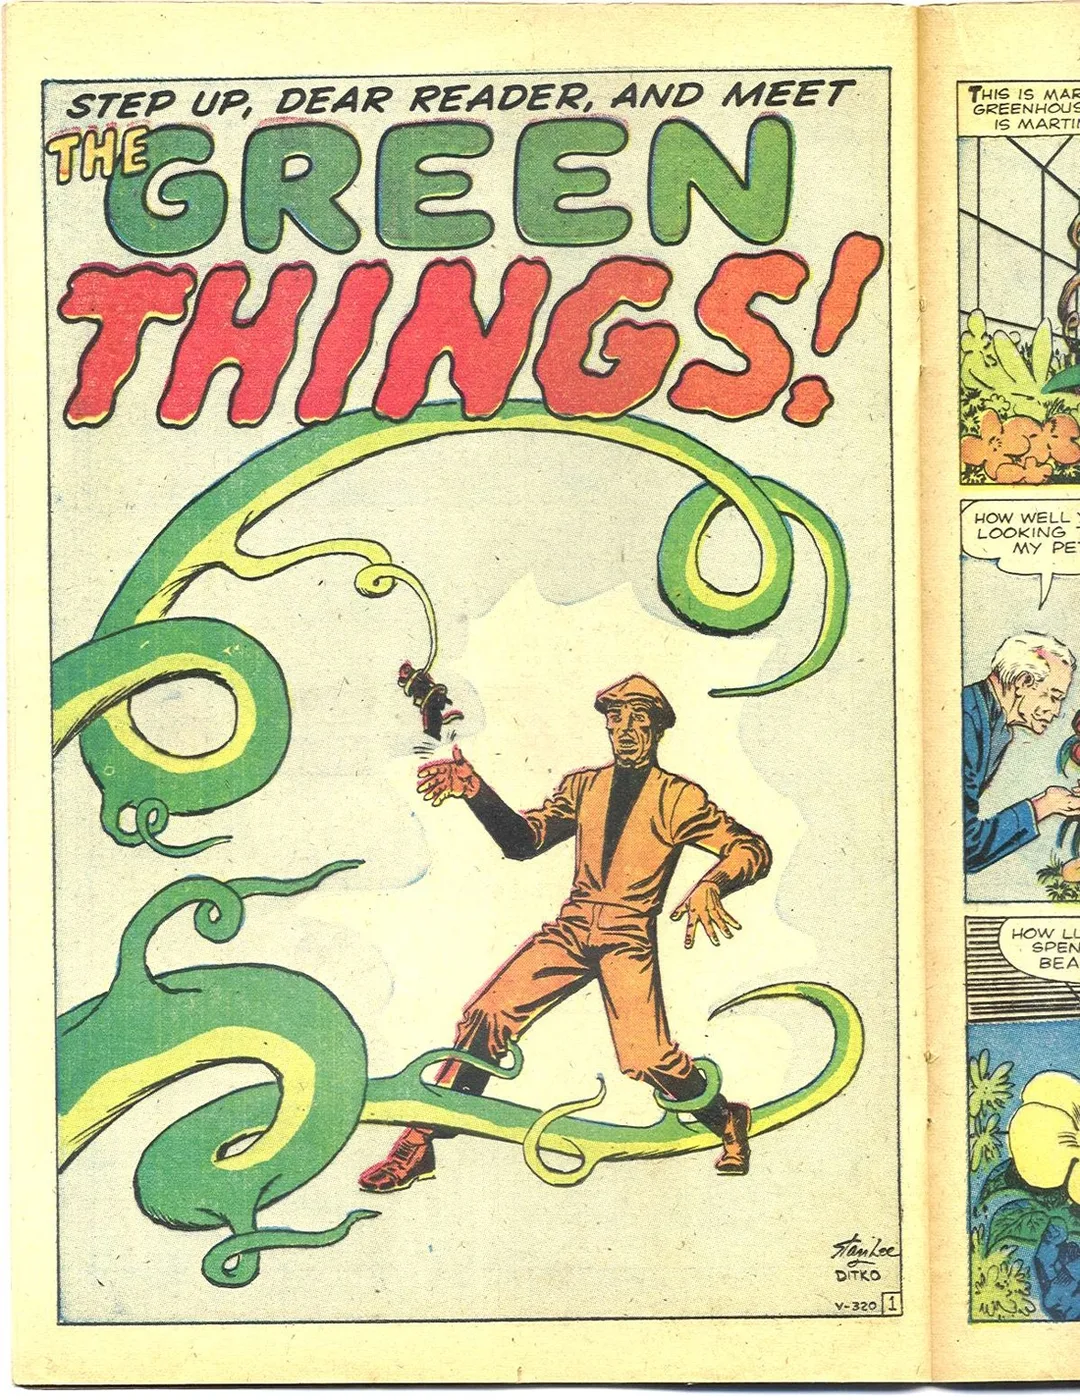
Appearing in "The Green Things!"
Other Characters: Makluans
Synopsis for "The Green Things!"
A thief attempts a robbery in a wealthy man's greenhouse but the plants come to his aid and seize the thief's gun and keep him covered with it.
Notes: No information for "The Touch Of Midas"
"Fin Fang Foom!" is reprinted in Fantasy Masterpieces (Volume 1) #2, Where Monsters Dwell #21 and Hulk vs. Fin Fang Foom #1.
One panel from this issue is partially reprinted in Astonishing Tales #1.
First appearance of Fin Fang Foom, arguably the most famous of Jack Kirby's stable of giant monster characters that were popular in the 1960s. This is the only Silver Age appearance of Fin Fang Foom. He makes a chronologically earlier appearance in the flashback sequences from Iron Man (Volume 1) #274 and #272 (respectively). He appears next in Astonishing Tales #23.
Though Foom was orange in the pages of Strange Tales #89, the cover had him colored green. His later appearances kept that green color, making his debut now seem slightly out of place. A later reprinting of this page changed the dragon’s look to reflect his updated look. Below left is the original version, right is a re-colored version.


- Published on
Batman Vol 1 #104
December, 1956
Executive Editor: Whitney Ellsworth
Cover Artists: Sheldon Moldoff. Ira Schnapp
The Man Who Knew Batman's Secret
Writers: Edmond Hamilton
Pencilers: Dick Sprang
Inkers: Charles Paris
Letterers: Pat Gordon
Robin's 50 Batman Partners
Writers: Bill Finger
Pencilers: Dick Sprang
Inkers: Charles Paris
Letterers: Pat Gordon
The Creature from 20,000 Fathoms
Writers: Bill Finger
Pencilers: Sheldon Moldoff
Inkers: Charles Paris
Letterers: Pat Gordon
Appearing in "The Man Who Knew Batman's Secret"
Featured Characters: Batman
Robin
Supporting Characters: Alfred Pennyworth (Also as Thaddeus Crane)
Commissioner Gordon
Villains: John Varden (Single appearance)
Other Characters: Laura Lee (Single appearance)
Locations: Gotham City
GCPD Headquarters
Wayne Manor
Batcave
Items: Gotham Gazette
Vehicles: Batmobile
Synopsis for "The Man Who Knew Batman's Secret"
Batman and Robin nab a pair of John Varden's hoods using a bazooka to loot a bank. The captured criminals refuse to rat on their elusive boss, but let slip the fact that Varden plans a big operation soon. To trap the gang leader, Batman and Robin hatch a plan and the next day, Batman and Robin patrol the rooftops of Gotham City in plain sight, drawing the attention of a crowd of reporters, among which is Thaddeus Crane, a detective from upstate who has come to study Batman's and Robin's crimefighting methods. Crane climbs to a roof top to interview the dynamic duo, and catches Batman with his cowl off, in the process of changing to Bruce Wayne.
Thaddeus Crane announces to the reporters that he knows Batman's secret identity, and Batman and Robin admit they will have to guard him to keep it secret. Crane is hired by the chairman of a camera show featuring a huge camera as an exhibit and a movie company president to guard the exhibits and his bejeweled star Laura Lee, respectively. Though Varden's mob strikes in both places, Batman and Robin thwart their efforts and make it seem as if Thaddeus Crane has overcome the crooks. John Varden's mob eventually cons Crane into their clutches, and he meets with the mobster, though he steadfastly refuses to reveal Batman's identity. But Batman and Robin, who have used Crane (with his permission) as bait for their trap, break in and defeat Varden and his gang. Crane later announces he is leaving Gotham, and disappears forever. But, in the Batcave, it is revealed that Crane was in fact Alfred, Batman's butler, whose middle names are Thaddeus Crane and they planned everything from the beginning in order to capture the crooks.
Appearing in "Robin's 50 Batman Partners"
Featured Characters: Robin
Supporting Characters: Batman
Alfred
Villains: Sparkles Grady (Single appearance)
Locations: Gotham City
Wayne Manor
Items:Batman Robot
Synopsis for "Robin's 50 Batman Partners"
Batman breaks his ankle during a fracas with the Sparkles Grady mob, and Robin has to take his place as representative at the Batman Exposition. The Exposition, covered on TV, features fifty images of Batman in various forms--as a colossal robot, a giant statue, a mechanical figure on a great clock, and so forth. Grady, watching the program, notes that Robin still holds the pouch of diamonds recovered from their heist, and takes himself and his gang to the exposition after hours where only they and Robin, who is taking photographs of the exhibits, are present. Robin is outnumbered, and endangered when the gang chief orders the Batman-robot to "get" him, but uses the many Batman exhibits (including the mechanical clock figure, who smashes the robot with a stroke of his hammer) to even the odds. Finally, exhausted, Robin tries out a mystery exhibit. It proves to be a giant fireworks display forming a great head of Batman, and its brilliance momentarily blinds the thugs. He nets Grady and his gang with the cape from the giant Batman statue and summons the police to haul them away. Later, at Wayne Manor, Bruce expresses regret that he could not have helped Robin, but Robin replies that he was with him all the time.
Appearing in "The Creature from 20,000 Fathoms"
Featured Characters: Batman
Robin
Supporting Characters: John Briggs (Single appearance)
Fergus (Single appearance)
Sloan (Single appearance)
Villains: Devoe (Single appearance)
Locations: Gotham City
Batcave
Synopsis for "The Creature from 20,000 Fathoms"
Batman and Robin, as honorary members of the 50 Fathoms Club, a group of underwater specialists, attend a meeting at which deep-sea diver Devoe presents photos of Babonga, a giant saurian monster which appears periodically at a Pacific island which Devoe visited. The members vote unanimously to put up the money to bring Babonga and exhibit it, with all of them together (including Batman and Robin) in on the Babgonga shows up as promised and the club members take aim with rifles loaded with mercy bullets--except that a first shot goes awry and blasts a section of ship's rail out, explosively. Batman, realizing their bullets have been switched, has the hunting party hold their fire and repels the beast with a brilliant flash from a camera. One of the party, he says, wishes to kill Babonga rather than bring it back alive.
Batman foils an attempt upon on his own life and lures Babonga out of danger when senses their gas bombs have been filled with poisonous acid instead, but the culprit remains beyond his grasp. Then when the dynamic duo go down in a bathysphere, their connecting chain to the ship is cut--as they had expected. The pair go out in diving suites they had left in the bathysphere and beard Bobanga in its lair, drugging it with paralyzer serum. The two heroes surface with the evidence to condemn the guilty party--Babonga's egg. Devoe, the malefactor, confesses that he had intended to kill Bobanga so that the egg which he owned would the only living member of its species, thus enabling him to make a fortune himself from the exhibitions. Batman replies that he knew his identity after the assault, since the deep grooves on his wrists, caused by his diving suit's sleeves, were a dead giveaway. Bobanga is taken back alive for exhibition and study. Batman remarks later that the egg will take a century to hatch, anyway, and when it does, it will hatch in the trophy room of the Batcave.
- Published on
King Kong #3
Monster Comics
May 1991
Editor: Gary Groth, Ryder Windham
Cover Artist: William Stout
Artist: Donald Simpson, William Stout
Writer: Donald Simpson
Part 3: Death in Devil's Chasm!
Kong shakes most of the sailors off the log bridge and into the chasm, where they are eaten by a swarm of giant spiders.
Kong's efforts to catch Driscoll are interrupted when Ann is attacked by a large meat-eating dinosaur, an Allosaurus. Kong fights and kills the dinosaur, then picks up Ann and moves on with Driscoll in pursuit. Denham, meanwhile, is sent back for reinforcements.
Trivia: Stout's cover shows Kong battling a Tyrannosaurus (when it is clearly an Allosaurus in the actual story).
Based on the 1932 novelization by Delos W. Lovelace and thus differs from the movie in numerous places. Notably, the ship is called the Vastator instead of the Venture and the characters of Charlie the Chinese cook and Second Mate Briggs are absent, replaced by a character from Lovelace's novel named Lumpy. The comic also contains several scenes not found in the film including the infamous "spider pit" scenes and extra encounters with dinosaurs by the search party. Other notable changes include the addition of a character totally original to this comic, Denham's assistant Wally, and an extended sequence of several dinosaurs joining Kong in attacking the native village.